Power BI
Mawidabp exposes a Web endpoint so Power BI (or other BI tools) can consume findings and follow-up data and build their own dashboards. This guide describes how to obtain the credentials from Mawidabp and how to configure them in Power BI Desktop.
What data is exposed
The current endpoint returns the list of findings (issues and opportunities) with their metadata:
- Code, title, description.
- Status, risk, priority.
- Key dates (origin, commitment, closure).
- Responsible auditors and auditees.
- Associated review and project.
- Tags.
Think of the endpoint as a tabular list: each row is a finding and each column a property. Power BI transforms it and relates it with other sources.
Prerequisites
- Power BI Desktop installed.
- A Mawidabp user with a profile that enables viewing the findings token. The profile must have the corresponding privilege configured (see below).
Configure the profile to expose the token
For a user to see the authorization token from Mawidabp, their profile must explicitly enable it:
- Administration → Security → Profiles and privileges.
- Edit the user's profile that will use Power BI.
- Enable the read privilege on the Follow-up module and access to the findings token.
- Save.
If you don't have access to the profile, ask the administrator to enable it.
Get URL and token from Mawidabp
- Sign in to Mawidabp with the enabled user.
- Follow-up → Findings.
- Find the Link section (in the filters or the side panel, depending on the version).
- Copy:
- The endpoint URL.
- The authorization token.
The token is sensitive: do not share it or commit it to repositories. If it is compromised, ask support to revoke it.
Configure the connection in Power BI
1. Open Power BI Desktop and add source
- Home tab → Get data.
- Search for Web and select it.
2. Configure the Web connection
- In the configuration window, choose Advanced.
- URL: paste the URL you copied from Mawidabp.
- Add an HTTP header:
- Header name:
Authorization - Value:
Bearer <token>(replacing<token>with the value you copied).
- Header name:
- OK.
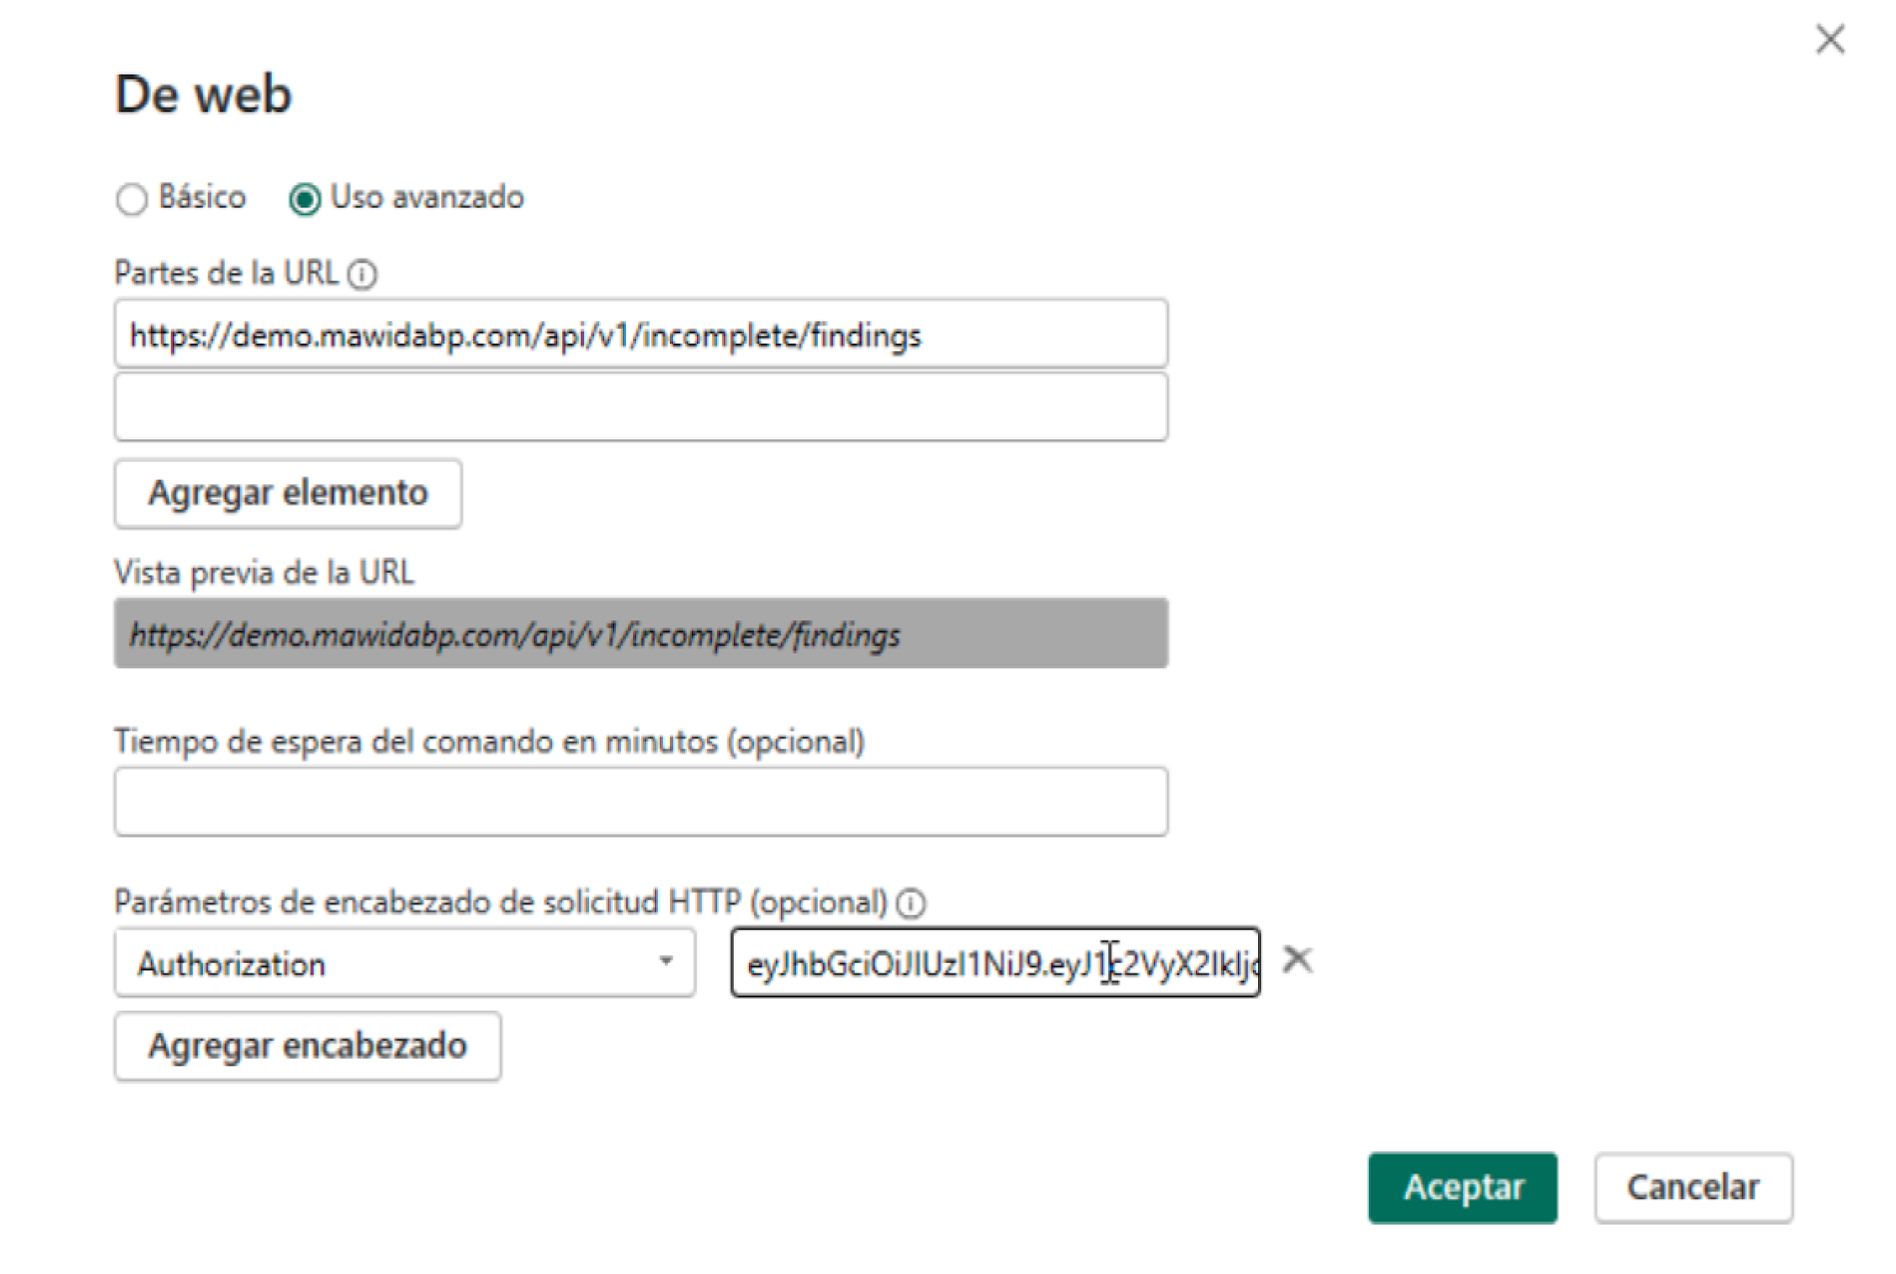
Power BI loads the data. From here it is standard Power BI: apply transformations, create relationships with other sources, and build the visualizations.
Automatic refresh
For the dataset to update periodically:
- If the report is published in Power BI Service, configure Scheduled refresh with the header credentials stored.
- Make sure the token does not expire; if it is regenerated, update it in Power BI Service too.
Useful report examples
With the findings data you can build:
- Pending dashboard by responsible — bars with the count of open issues per auditee.
- Findings evolution over time — line with open findings per month, separated by status.
- Risk heatmap — matrix of business unit × risk × count.
- Deadline compliance — percentage of findings closed within the committed date, per unit.
- Average time to resolution — average days between "Notify" and "Implemented/Audited".
Common problems
"Could not connect to the server": verify the URL is reachable from the network where Power BI runs. If Mawidabp is on a private network, you may need a data Gateway.
"401 Unauthorized": the token is mistyped or expired. Regenerate it from Mawidabp.
"403 Forbidden": the user associated with the token does not have permission to view the Follow-up module or token access. Review the profile.
Missing columns you expected: the endpoint returns a defined subset of fields. If you need others, open a request with support.
Support
For any questions, write to soporte@mawidabp.com.